Often times, customers will ask us to add customization to an existing form in NetSuite requiring an action to be performed on-click of a new button. In this article we'll discuss each of the options available to you to create custom logic on the click of a button in NetSuite. The first question we need to ask is, what type of logic is required? Depending on the complexity of the business logic that is needed to handle the button click action, this will dictate which technique is appropriate. In the simplest case, when the added button is clicked it will change the value of a field or the status of the record when pressed, or perform another action that is supported in a workflow (SuiteFlow).
Without writing a single line of code, we can add customization in NetSuite using workflows to perform many different behaviors and complex logic. The actions supported by workflows include:
| Action Name |
Description |
| Add Button |
Adds a button to a record form. |
| Confirm |
Display a popup message with OK and Cancel buttons. |
| Create Record |
Create a new record. |
| Go To Page |
Redirect users from a record in a workflow to a specified page in NetSuite. |
| Go To Record |
Redirect users to a specific record in NetSuite. |
| Initiate Workflow |
Initiate another workflow instance from the current workflow instance. |
| Lock Record |
Lock the record for the workflow instance. |
| Remove Button |
Remove a button from a record form. |
| Return User Error |
Display an error message to users. |
| Send Campaign Email |
Send an email as part of a marketing initiative. |
| Send Email |
Send an email. See Send Email Action. |
| Set Field Display Label |
Change the UI label of a field. |
| Set Field Display Type |
Change the display type of a field. |
| Set Field Mandatory |
Require a field to have a value. |
| Set Field Value |
Set the value of a record field. |
| Show Message |
Display a message to the user. |
| Subscribe To Record |
Track a workflow or state field that contains a reference to a record. |
| Transform Record |
Transform the data on a transaction record into another transaction record type. |
| Custom |
Define an action with a Workflow Action script. |
We tend to use workflows for simple actions to be triggered when reaching a state, but for more complex requirements beyond what can be implemented in workflows and built-in actions, we’ll use SuiteScript. If we want to add SuiteScript code in the context of a Workflow, we may do so in Custom Workflow Actions (Workflow Action Script).
The next question we must ask is, what type of logic is required? Is it simple conditional logic (if/else conditions)? Or does the automation require a conditional loop (for or while loop)? If so, we likely will need SuiteScript. Do we need to access sublists or subrecord? One of the largest drawbacks to workflows are that they do not allow customization to sublists and subrecords. In other cases, workflow actions do not have support for SuiteScript API’s (e.g. XML API). So, in these cases we turn to SuiteScript to get the job done.
Workflow Action Script
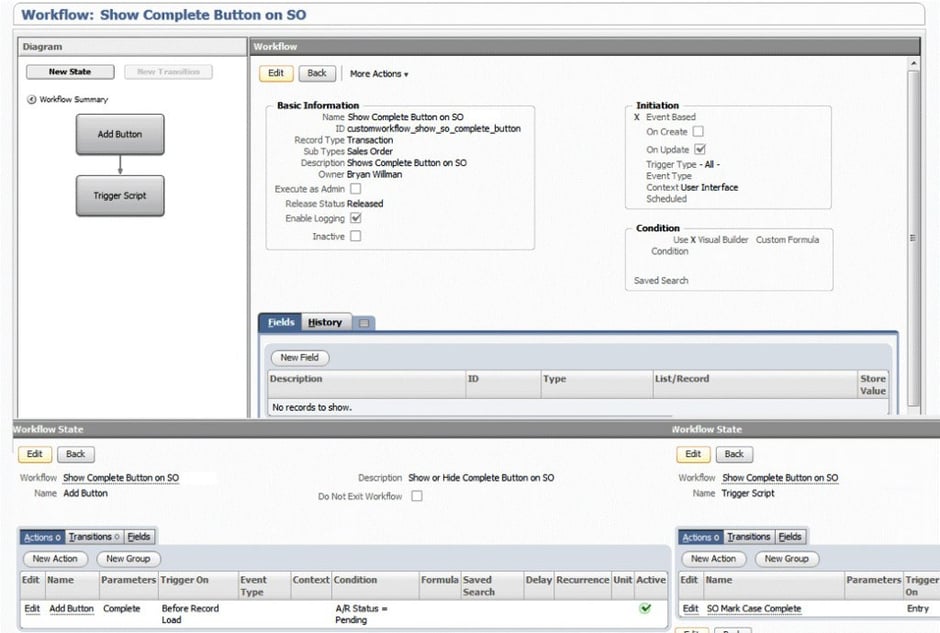
To give an example of how we can leverage a Workflow Action Script, let’s assume we have the requirement to show a “Completed” button on a Sales Order when the Sales Order is linked to a Case record in NetSuite. If the Sales Order is linked to a Case Entry form, the status on the Case entry form should be changed to “Completed” when the “Completed” button is pressed on the Sales Order. To achieve this, we can add a new “Completed” button to the Sales Order form via configuration. When this button is clicked, it will trigger a new workflow action script called ‘Mark Case Complete’ to change the A/R Status to “Complete” on the Sales Order. If there are any Purchase Orders with the Case number that are not partially or fully received an alert message will be displayed to the user stating, ‘’, and the script will exit. However, if there are no Purchase Orders with the Case referenced, or all Purchase Orders have been at least partially received that do have a reference to the Case, then if the Sales Order is linked to a Case Entry form, the status on the Case entry form will also be changed to “Completed”. The following script logic will be triggered when a new ‘Completed’ button is pressed on the Sales Order form:
Load the value for the Case Record (custbody_case_record)

If (Case Record != NULL) {
	Load Case Record
	Set Status of Case Record to ‘Completed’
	Save Case Record
}

Set the value for the A/R Status on the Sales Order (custbody_ar_status) to ‘Complete’
The “Completed” button will be visible when the A/R Status field is set to Pending and the Sales Order is in the state Pending Fulfillment or Pending Billing. The workflow, ‘Show Complete Button on SO’ will be configured with the following properties to show/hide the Complete button on the Sales Order forms:

Get Started Now
The easiest way to get started is to contact Techfino today. If you’d like a little more information first, you can download our ContinuedSuccess Whitepaper. Either way, we hope you’ve found this guide helpful and hope that we can further assist you on your path to leveling up your NetSuite Support.


